Content
- Introduction
- Robot Setup
- Accounts Setup
- Server Setup
- Getting Started
- Controls
- References
- Trademarks
Back to Documentation Library
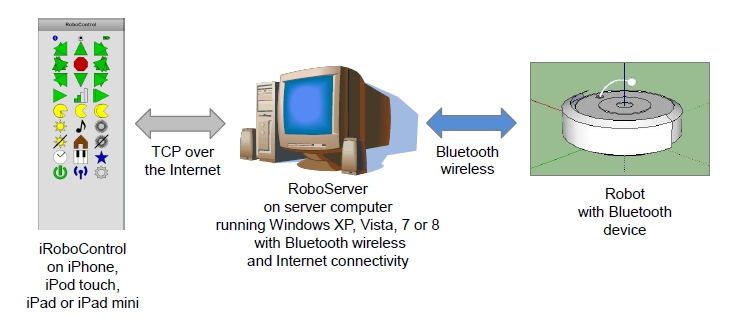
RoboServer is a server for your robot. It maintains a communication link with your robot using Bluetooth wireless. It redirects commands from such applications as RoboControl and iRoboControl received over your local network or over the Internet to your robot via Bluetooth wireless. It is already included in RoboControl. It needs to be installed and started prior to using iRoboControl. No homemade electronics or programming is required. Basic computer skills are required.
Purpose
The purpose of this document is to provide users with a step-by-step guide on how to setup and use RoboServer.
Scope
The scope of this document is limited to providing guidance on RoboServer. For assistance on the hardware required by RoboServer, contact the manufacturers of this hardware.
Architecture
Features
RoboServer provides the following features:
- Web console graphical user interface.
- Send commands to your robot.
- Receive sensor data from your robot.
- Provide TCP port connectivity for RoboticApp Web and iOS applications.
- Email and SMS alerts with Gmail.
- Sensors tracking dashboards with ThingSpeak.
- Social networking with Facebook.
- Web server and browser included with the application.
- Client running on any browser, any device and any platform.
- Server running on Windows.
- Web application.
RoboServer requires RoboControl or iRoboControl to provide these features.
Requirements
RoboServer requires the following components:
- Server computer running Windows XP, Vista, 7 or 8 with Bluetooth wireless and Internet connectivity.
- Roomba (any model manufactured after October 2005), Create or Mindstorms NXT.
- RooTooth Bluetooth device (required for Roomba and Create only).
To view the robot components.
The Rootooth is a class 1 Bluetooth device which provides a range of 100 meters (330 feets). The Mindstorms NXT is equipped with a class 2 Bluetooth device which provides a range of 10 meters (33 feets). To get the best range and performance, you should have a Bluetooth class 1 radio on your server computer.
Robot Components
The robot components required by RoboServer can be ordered from the following links:
- To order Roomba, Create or Mindstorms NXT.
- To order RooTooth Bluetooth device.
Assistance
If you need assistance in setting up or using RoboServer, visit www.roboticapp.com/support.html or send us an email at info@roboticapp.com.
Overview
This document is organized into the following sections:
- Introduction: Introduction to this document.
- Robot setup: Steps to setup hardware on your robot.
- Server setup: Steps to setup software on your server computer.
- Getting started: Steps to start RoboServer.
- Controls: Instructions on how to control RoboServer from the Web console.
- References: Useful references.
- Trademarks: Trademarks used thoughout this document.
Back to top
To setup your robot:
- Setup Robot Hardware (required for Roomba and Create only).
1. Setup Robot Hardware
RoboServer uses the RooTooth Bluetooth device with the Roomba or Create, or the Bluetooth capabilities of the Mindstorms NXT to communicate with your robot wirelessly.
To setup your robot hardware on a Roomba or a Create:
- Remove your robot from its docking station.
- Turn off your robot by pressing and holding the "CLEAN/POWER" button until it powers down.
- Remove the faceplate or serial port protector from your Roomba, or the serial port protector from your Create.
- Connect the RooTooth to your Roomba or Create 7 pin mini din serial port.
- Turn on your robot by pressing the "CLEAN/POWER" button.
To view the procedure with screenshots.
To setup your robot hardware for Mindstorm NXT:
- Build the robot from the "Lego Mindstorms User Guide" (pages 5 to 15) provided with your kit.
- Connect the sensors according to the standard port settings as described in the "Lego Mindstorms User Guide" (pages 16 to 17) provided with your kit.
Back to top
RoboControl provides optional capabilities for Email and SMS alerts with Gmail, sensor dashboard displays with ThingSpeak, and robot social networking with Facebook.
To create accounts for alerts, dashboards and social network:
- Create Gmail Account (optional).
- Create ThingSpeak Account (optional).
- Create Facebook Account (optional).
1. Create Gmail Account
RoboControl requires a Gmail account to send Email and SMS alerts. This account can be your own or you can create one for your robot.
To view the list of alerts.
To create a Gmail account:
- Visit mail.google.com.
- Click "CREATE AN ACCOUNT".
- Fill the following mandatory fields: Name, Choose your username, Choose your password, Confirm your password, Birthday, Gender, Prove you're not a robot and Location.
- Click "Next Step".
- Click "Continue to Gmail".
To view the procedure with screenshots.
2. Create ThingSpeak Account
RoboControl provides capabilities to transfer your robot sensor data to an account on the ThingSpeak portal. This allows you to see the evolution of your robot sensors over time. When your robot is active, sensor data is transfered once every minute. When it is not active, sensor data is transfered once every hour.
To create a ThingSpeak account:
- Visit www.thingspeak.com.
- Click "Sign Up".
- Fill the following mandatory fields: User ID, E-mail, Time Zone, Password and Password Confirmation.
- Click "Create Account".
- Click "Create New Channel".
- Click the "Channel Settings" tab.
- Fill Fields 1 to 6 with the following values: Left Wheel, Right Wheel, Vacuum, Bumper, Cliff and Battery.
- Click "Update Channel".
- Click the "API Key" tab to get the API key required by the installer.
To view the procedure with screenshots.
3. Create Facebook Account
RoboControl provides capabilities to automatically create posts on the Facebook account of your robot.
Limitation: The access token generated by Facebook and used by RoboControl has a lifespan of only a few hours. You will need to generate a new one and update your RoboControl settings once it has expired if you want your robot to keep on posting to its wall.
To view the list of posts (same as alerts).
To create a Facebook account:
- Visit www.facebook.com.
- Fill the following mandatory fields: First Name, Last Name, Your Email, Re-enter Email, New Password, Birthday, and Male or Female.
- Click "Sign Up".
- Visit developers.facebook.com/tools/explorer.
- Click on the "Get Access Token" button.
- On the "Select Permissions" window, click "Clear".
- On the "Select Permissions" window, click "Extended Permissions".
- Under the "Extended Permissions" tab, select the following options: offline_access, publish_stream and read_stream.
- Click the "Get Access token" button.
- On the "Graph API Explorer" window, click "Log In with Facebook".
- On the "Request for Permissions" screen, click "Allow".
- Get the access token required by the installer from the "Access Token" field.
To view the procedure with screenshots.
Back to top
To setup RoboServer on your server computer:
- Setup Bluetooth Serial Connection.
- Install RoboServer.
- Setup Router (required only if RoboControl is to be used over the Internet).
1. Setup Bluetooth Serial Connection
This procedure will setup the connection between your computer and your robot. Once the connection is established, you should be able to remove the Bluetooth device from your robot and put it back in without having to re-execute this procedure.
To setup the Bluetooth serial connection to your robot:
- Plug-in a Bluetooth class 1 USB radio to your computer (not required if Bluetooth class 1 radio is already embedded in your computer).
- Click "Start > Control Panel".
- In the "Control Panel" window, click "Hardware and Sound".
- In the "Hardware and Sound" window, click "Devices and Printers".
- In the "Devices and Printers" window, click "Add a Device".
- In the "Add a Device" window, double-click "FireFly-XXXX" for RooTooth or "NXT" for Mindstorms NXT.
- Click "Enter the device's pairing code".
- Enter "1234" for the pairing code of RooTooth or Mindstorms NXT and click "Next" (you need to accept pairing on the Mindstorms NXT screen).
- Click "Close".
To view the procedure with screenshots.
2. Install RoboServer
The RoboServer installer will install RoboServer on your computer under the default home directory "C:\Program Files\RoboServer" or any other folder. It will also create the shortcut "RoboServer" on your computer desktop and the following shortcuts under "Start > All Programs > RoboServer":
- Start RoboServer Console
- Start RoboServer
- Start Web Server
- Stop RoboServer
- Stop Web Server
- Update RoboServer
- Uninstall RoboServer
- View RoboServer User's Guide
To install RoboServer on your server computer:
- Order and download RoboServer to a temporary folder.
- Double-click the "roboserver.exe" self-extracting executable.
- Follow the instructions.
3. Setup Router
This procedure will setup your router and firewall for RoboServer. RoboServer Console uses the HTTP protocol for communication between the Web browser on your client computer or device and your server computer. RoboServer also uses the TCP protocol for communication with RoboControl or iRoboControl. To access RoboServer over the Internet, RoboServer requires your router to have the HTTP protocol port of your choice (80 by default) mapped to your server computer private IP address. RoboServer also requires your server computer to have the port of your choice (80 by default) opened on your Windows and anti-virus firewalls. The steps that follow are based on a Cisco Linksys router. Depending on the make and model of your router, these steps may vary.
This procedure is required only if RoboControl is to be used over the Internet.
To setup the router:
- Open a Web browser and enter the address of your router (for example 192.168.1.1).
- Enter your "User name" and "Password" if your router requires authentication, and click "OK".
- Select the "Applications & Gaming" tab.
- Select the "Single Port Forwarding" tab.
- Enter application "RoboServer Console" with the following parameters:
- External port: Port you selected for RoboServer Console during installation (default 80).
- Internal port: Port you selected for RoboServer Console during installation (default 80).
- Protocol: TCP.
- To IP Address: IP address of your server computer.
- Enabled: Checked.
- Enter application "RoboServer" with the following parameters (required for using iRoboControl):
- External port: Port you selected for RoboServer during installation (default 12345).
- Internal port: Port you selected for RoboServer during installation (default 12345).
- Protocol: TCP.
- To IP Address: IP address of your server computer.
- Enabled: Checked.
- Click "Save Settings".
- Close the Web browser.
To view the procedure with screenshots.
Back to top
To get started:
- Start Web Server.
- Start RoboServer.
- Start RoboServer Console.
- Stop RoboServer
- Stop Web Server
- Update RoboServer.
- Uninstall RoboServer.
- View RoboServer User's Guide.
1. Start Web Server
The Web server needs to be started prior to using RoboServer. It can only be started and stopped from your server computer. To ensure availability of the Web server at all times, set your server computer to never sleep. To set your server computer to never sleep, click "Start > Control Panel", under the "Control Panel" window, click "System and Security > Power Options > Change when computer sleeps" and set "Put the computer to sleep" to "Never".
To start the Web Server from your server computer:
- Click "Start > All Programs > RoboServer > Start Web Server".
2. Start RoboServer
RoboServer needs to be started prior to using RoboControl or iRoboControl. It can be started from your server computer or from any computer or device connected to the Internet. On your server computer, it can be started from the Start menu. On any Web client, it can be started by entering the RoboServer Console URL in the address field of the Web browser and by pressing the green power button.To ensure availability of RoboServer at all times, set your server computer to never sleep. To set your server computer to never sleep, click "Start > Control Panel". Under the "Control Panel" window, click "System and Security > Power Options > Change when computer sleeps" and set "Put the computer to sleep" to "Never".
To start RoboServer from your server computer:
- Click "Start > All Programs > RoboServer > Start RoboServer".
To start RoboServer from any computer or device connected to the Internet:
- Start a Web browser on any computer or device connected to the Internet.
- In the address field of the Web browser, enter: "your http server address/roboserver/index.html" (for example "https://www.xelaration.net/roboserver/index.html").
- Enter your User Id and Password, and click "Login".
- Press the red power button to start RoboServer (Once started, the power button turns green).
3. Start RoboServer Console
RoboServer Console can run directly on your server computer or any Web client. On your server computer, it can be started from the Start menu or from the "RoboServer" shortcut on your desktop. On any Web client, it can be started by entering the RoboServer Console URL in the address field of a Web browser.
To start RoboServer Console from your server computer:
- Click "Start > All Programs > RoboServer > Start RoboServer Console" or double-click "RoboServer" on your desktop.
- Enter your User Id and Password, and click "Login".
- Press the red power button to start RoboServer (Once started, the power button turns green).
- Press the green power button to stop RoboServer (Once stopped, the power button turns red).
To start RoboServer Console from any computer or device connected to the Internet:
- Start a Web browser on any computer or device connected to the Internet.
- In the address field of the Web browser, enter: "your http server address/roboserver/index.html" (for example "https://www.xelaration.net/roboserver/index.html").
- Enter your User Id and Password, and click "Login".
- Press the red power button to start RoboServer (Once started, the power button turns green).
- Press the green power button to stop RoboServer (Once stopped, the power button turns red).
4. Stop RoboServer
RoboServer can be stopped from your server computer or any Web client. On your server computer, it can be stopped from the Start menu. On any Web client, it can be stopped by entering the RoboServer Console URL in the address field of the Web browser and by pressing the green power button.
To stop RoboServer from your server computer:
- Click "Start > All Programs > RoboServer > Stop RoboServer".
To stop RoboServer from any computer or device connected to the Internet:
- Start a Web browser on any computer or device connected to the Internet.
- In the address field of the Web browser, enter: "your http server address/roboserver/index.html" (for example "https://www.xelaration.net/roboserver/index.html").
- Enter your User Id and Password, and click "Login".
- Press the green power button to stop RoboServer (Once stopped, the power button turns red).
5. Stop Web Server
The Web server can only be started and stopped from your server computer.
To stop the Web Server from your server computer:
- Click "Start > All Programs > RoboServer > Stop Web Server".
6. Update RoboServer
The RoboServer Updater will update RoboServer on your server computer.
To update RoboServer on your server computer:
- Click "Start > All Programs > RoboServer > Update RoboServer".
- Follow the instructions
7. Uninstall RoboServer
The RoboServer Uninstaller will uninstall RoboServer from your server computer. It will remove all RoboServer files, folders and shortcuts from the following locations:
- Home directory "C:\Program Files\RoboServer", or any home directory you selected during installation, and all its content.
- All shortcuts under the folder "Start > All Programs > RoboServer" and the folder itself.
- Shortcut "RoboServer" on your computer desktop.
- Folders "cgi-bin\roboserver" and "htdocs\roboserver", and all their content.
To uninstall RoboServer from your server computer:
- Click "Start > All Programs > RoboServer > Uninstall RoboServer".
- Follow the instructions.
8. View RoboServer User's Guide
The View RoboServer User's Guide shortcut links to this page.
To view the RoboServer User's Guide from your server computer:
- Click "Start > All Programs > RoboServer > View RoboServer User's Guide".
To view the RoboServer User's Guide from any computer or device connected to the Internet:
- Start a Web browser on any computer or device connected to the Internet.
- In the address field of the Web browser, enter www.roboticapp.com/server30.html.
Back to top
RoboServer is organized in 2 different panels:
- Controls: Controls to establish communication with your robot.
- Settings: Settings and instructions.
To view the list of all valid controls.
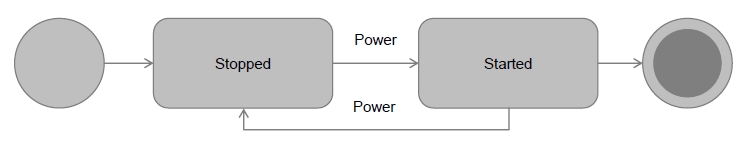
RoboServer States
RoboServer can be in one of two states: Started or Stopped. In Started state, it maintains a Bluetooth connection with your robot. In Stopped state, it is disconnected from your robot. When the power button on the Controls panel is red, your robot is in Stopped state. Press the red power button on the Controls panel to switch to Started state. When the power button on the Controls panel is green, your robot is in Started state. Press the green power button on the Controls panel to switch to Stopped state.
Back to top
- iRobot Roomba Open Interface (ROI) Specification (Adobe Reader required).
- iRobot Create Open Interface (Adobe Reader required).
- iRobot Roomba 500 Open Interface (OI) Specification (Adobe Reader required).
- RoboDynamic RooTooth User Guide (Adobe Reader required).
- Mindstorms Support.
Back to top
- RoboControl, iRoboControl and RoboServer are trademarks of Xelaration Software Corporation.
- Xelaration is a registered trademark of Xelaration Holding Corporation.
- Roomba and Create are registered trademarks of iRobot Corporation in the United States.
- Mindstorms is a trademark of the LEGO Group.
- Windows is a registered trademark of Microsoft Corporation in the United States and other countries.
- iPhone, iPod touch, iPad and iPad mini are trademarks of Apple Inc., registered in the United States and other countries.
- Cisco and Linksys are registered trademarks of Cisco Systems Incorporated.
Back to top
|

